

I Have Mulpiple Scan Under Same Scan World, How To Seperate The Scans And Register?
How to Install Acunetix Multi-Engine
Configuring Engines
The Acunetix Multi-engine setup is suitable for Enterprise customers who need to scan more than 10 websites or web applications simultaneously. This can be achieved by installing one Chief Installation and multiple Scanning Engines, all managed from a central console.
Configuring engines is a three pace process:
- install the new engine
- register the scanning engine with the main installation
- authorise the scanning from the primary installation
| 🔍 Downloading the Acunetix Installer |
| Y'all can obtain the Acunetix Installer from this download link . |
Installing Acunetix Stand up-Lone Engine
The only role of the Acunetix Scanning Engine installations is to perform scans when requested from the Chief Installation. The Acunetix Engine configuration is but used to annals the engine with the Chief installation. Proceed as follows to install an Acunetix Scanning Engine:
- Copy the Acunetix installation to the motorcar. The installation file for the Main Installation is the same file you need to utilise to install the stand up-alone Scanning Engine on a different machine.
- From the command prompt, run the installation with the /engineonly switch. (If installing the engine on Linux, use --engineonly)

- This will beginning the installation of the Acunetix Scanning Engine
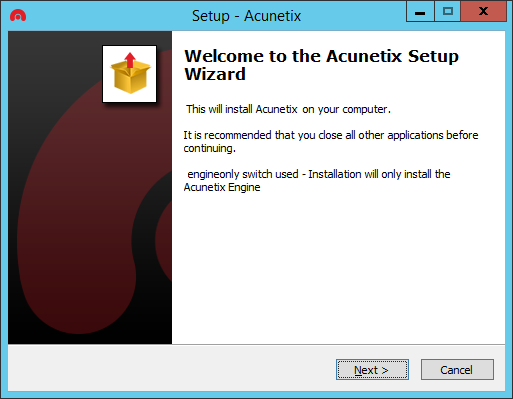
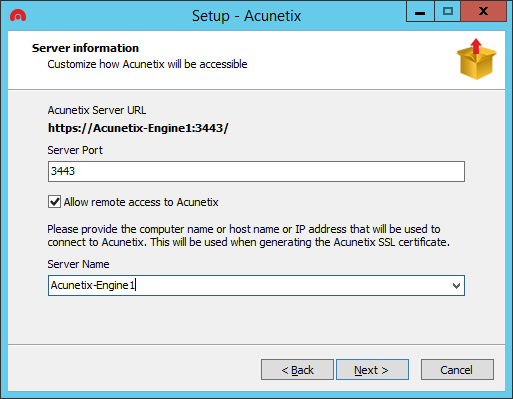
- Go on with the installation. Once again, you lot volition need to enable "Let remote access to Acunetix", and specify a Server Name that is accessible from the Acunetix Main Installation.
- Continue and finish the installation.
Register Scanning Engine
Later on the installation of the Scanning Engine, you will need to annals the Scanning Engine with the Principal Installation. This process is initiated from the Scanning Engine.
- Browse to the Acunetix Engine Registration folio.
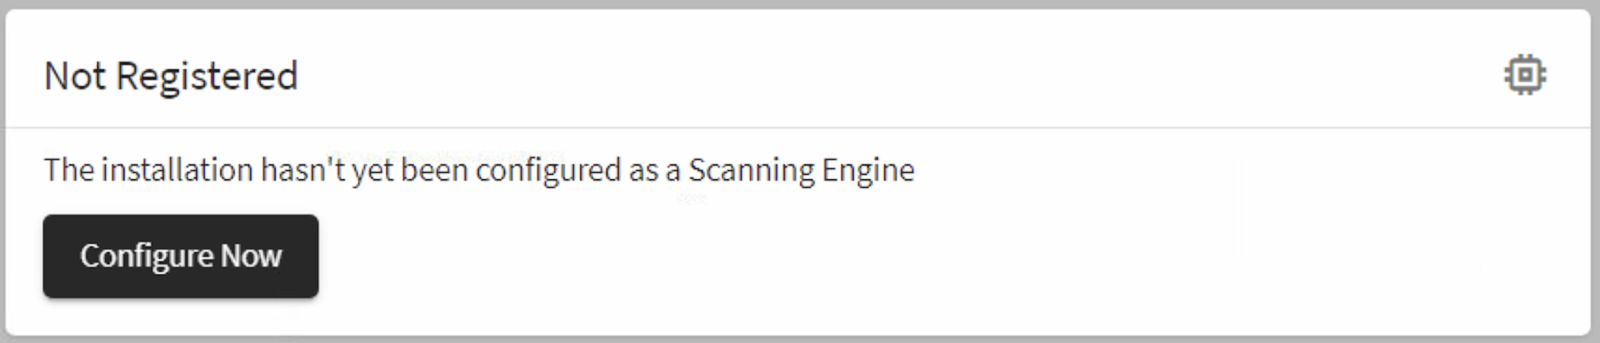
- Click on the "Configure Now" push
- Provide a Unique proper noun for this Scanning Engine instance, and then as to differentiate information technology from the other Scanning Engines.

- Ostend that the "Scanning engine accost (this instance)" reflects the accost of this Scanning Engine Instance. Usually this can be kept every bit default.
- Configure the address of the Main Installation. Ensure you include the port number.
- If needed, select to Ignore SSL Errors
- Click Annals in one case done.

Authorise Scanning Engine from Principal Installation
All the Scanning Engine registration requests need to be authorised from the Chief Installation. This ensures that the Main Installation administrator remains in control of all the Scan Engine registrations.
- From the Principal Installation, select the "Engines" menu option
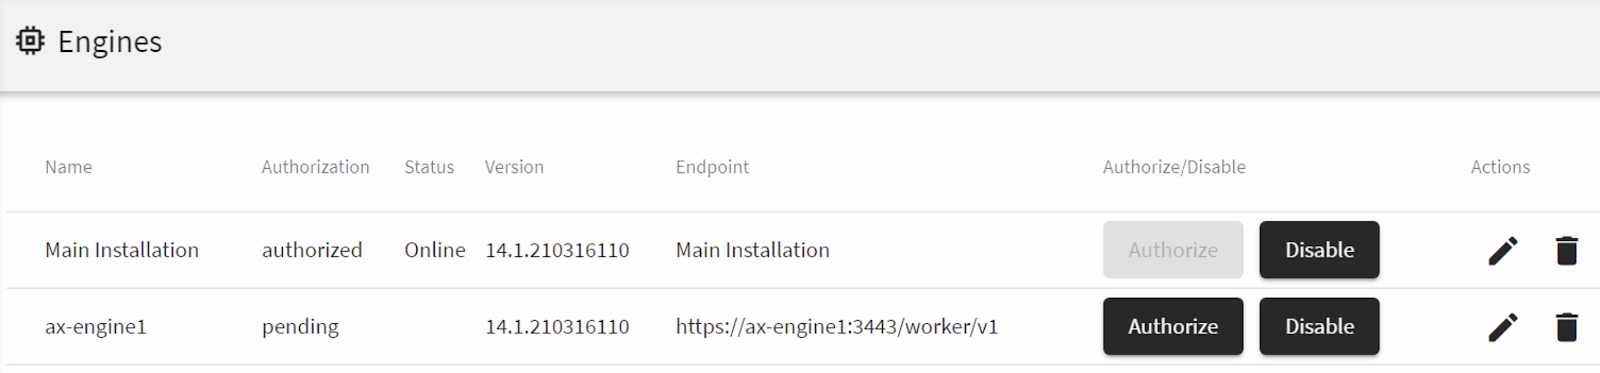
- Here you will come across all the Engines configured, including the ones which are pending Authorization.
- Select the Scan Engines which are pending Authorization, and click Authorize to confirm their Registration.
- The Status of the Browse Engine request will change to Online, and the version of the Scan Engine is updated.

- Dorsum on the Scan Engine car, the Browse Engine is now shown as Registered

Once this is done, any scans configured on the Principal Installation will be distributed betwixt the Scanning Engines configured.
Notes:
- The License on the Main Installation volition be propagated to the Scanning Engine installations when the Scanning Engines are Authorized.
- The Scanning Engine on the Main Installation cannot be disabled.
- Y'all can configure a Target to always exist scanned using the aforementioned Scanning Engine. This tin be done from the Target Settings > Advanced > Scanning Engine. Enable the setting, and cull the Scanning Engine to exist used for this Target.
- The Acunetix Chief Installation and the Acunetix Engines communicate over port 3443. Firewalls should exist configured to allow these connections both means.
« Back to the Acunetix Support Folio

Source: https://www.acunetix.com/support/docs/how-to-install-acunetix-multi-engine/
Posted by: penaseemase.blogspot.com
0 Response to "I Have Mulpiple Scan Under Same Scan World, How To Seperate The Scans And Register?"
Post a Comment